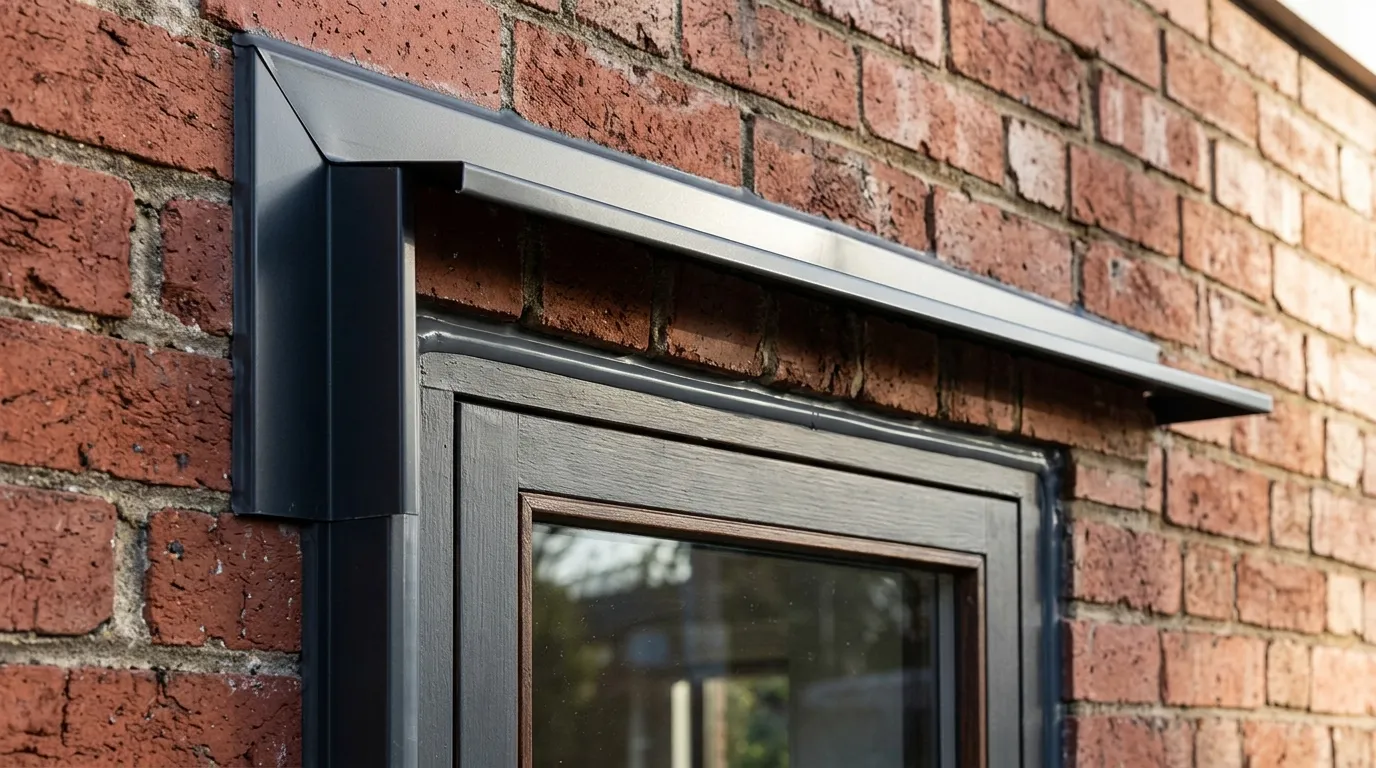
Drive down any street in Saint-Laurent, Laval or the West Island and you will see it: crisp aluminum trim wrapping the outside of windows that were installed years ago. Capping is one of the most common exterior finishes in Quebec, and one of the least understood. Done well it sheds water for decades; done badly it hides rot until the day the frame falls apart in your hands.
What aluminum capping actually is
Capping is a thin sheet of pre-painted aluminum, usually 0.019 to 0.024 inch (about 0.5 to 0.6 mm), cut and bent on site with a portable brake to wrap the exposed exterior wood around a window. It covers the brickmould, the sill nose, the jamb extensions and any wood trim that would otherwise need paint every few years. The metal is folded into an L or J profile, pressed onto the wood and held with colour-matched trim nails or aluminum screws, then sealed at the joints.
The point is not decoration. Wood on the outside of a Quebec house takes 100 to 120 freeze-thaw cycles a winter, road salt spray near the street, and UV that bleaches paint by July. Capping puts a maintenance-free skin over that wood so the substrate stays protected and the house keeps a clean, uniform line. On a replacement window it also bridges the small gap between the new frame and the old cladding without rebuilding the exterior.
It is worth knowing what capping is not. It is not structural, it is not a water barrier on its own, and it is not a substitute for flashing behind the cladding. Treating it as any of those three is how most capping problems start.
When capping makes sense: brickmould, wood trims and retrofit frames
The classic case is a wood or clad-wood window with a wooden brickmould. Brickmould is the moulded trim that sits between the window frame and the masonry or siding, and it is the first thing to check and crack. Capping it in aluminum eliminates repainting and keeps the profile looking sharp. Many Montreal duplexes and 1960s to 1980s bungalows in Laval, Longueuil and the West Island still carry original wood brickmould that has been capped once already, often twenty years ago.
Capping is also the standard answer when a new PVC or hybrid window is installed inside an existing wood frame, the so-called insert or retrofit installation. The old exterior wood stays, the new unit sits inside it, and aluminum wraps the leftover wood so the transition looks finished. It is faster and cheaper than a full tear-out, which is exactly why it is so common in resale renovations.
There are situations where capping is the wrong call. If the wood underneath is already soft, checked or discoloured from moisture, wrapping it locks the problem in. A full-frame installation that removes the old wood, rebuilds the sill and installs new flashing membrane is the honest fix. We walk through the difference in our guide to professional window installation, and it is the first question a good estimator should answer on site before quoting a capping job.
- Good candidates: sound wood brickmould, jamb extensions on clad-wood units, retrofit windows in a healthy existing frame
- Think twice: any wood that is soft to a screwdriver, a sill without a visible slope, frames with old peeling paint and staining below the corners
- Skip it: rotten frames, sills that hold water, openings with no flashing behind the cladding
Colour matching and finish
Pre-painted aluminum coil comes in a standard palette of 25 to 40 colours from Quebec distributors: white, sandalwood, commercial brown, charcoal, black and a growing range of dark greys that match the current taste for black-framed windows. The baked-on finish is typically a polyester or PVDF coating rated for 15 to 25 years of colour retention. Darker colours absorb more heat and expand more, so they need slightly more room at the joints and a sealant that tolerates movement.
Matching the capping to the window frame is the usual goal, but it is not the only option. On a red-brick facade with black windows, a black capping line makes the openings read as one crisp element. On a pale stucco house with white frames, a contrasting charcoal cap can outline the windows the way a painted trim would. Ask for a physical colour chip held against the frame in daylight rather than choosing from a screen, because whites and greys shift dramatically under different light.
A common mistake is capping the windows in one colour and leaving the door trims, fascia or soffit in another. A house reads as a whole from the street, so plan the colour once and apply it to every piece of exterior aluminum you replace over the years.
Flashing and drip caps: making water leave
Capping keeps water off the wood; flashing sends it back outside. The two work together. Above every window there should be a head flashing or drip cap, a small metal or membrane ledge that tucks up behind the cladding and kicks out over the top of the window so water running down the wall drops off the front edge instead of tracking behind the trim. On brick veneer it is normally a through-wall flashing with weep holes at the lintel; on siding it is a bent metal drip cap under the last course above the opening.
At the sill, the aluminum should be bent with a positive slope and a hemmed front edge that projects at least 20 to 25 mm past the wall, so drips fall clear of the cladding. A flat capped sill is one of the most common defects we see on inspection: water pools behind the lip, freezes, lifts the sealant and eventually finds the end grain of the wood. The bend on the brake takes thirty seconds and saves the sill.
Side jambs should overlap the sill cap from above so every seam sheds downhill, the same shingle logic that governs roofing and building membranes. When a crew caps the sides first and then the sill over them, the joints face uphill and every rain fills them.
- Head: drip cap or through-wall flashing tucked behind cladding, projecting past the face of the trim
- Sill: sloped, hemmed edge, minimum 20 mm projection, no fasteners through the top surface
- Jambs: lapped over the sill cap, never under it; end dams where the sill meets the jambs
Where capping fails: trapped moisture and hidden rot
The uncomfortable truth about capping is that aluminum is a vapour barrier. If moisture gets behind it, from a failed joint, a nail hole, wind-driven rain at the head or condensation from the interior, it cannot dry out. The wood under a tightly sealed cap can stay damp for months, and damp wood in a Quebec summer rots fast. From the street the window still looks perfect, which is why capping rot is so often discovered only at replacement time, when the installer pulls the trim and the sill crumbles.
Certain warning signs tell you what is happening underneath. Rust-coloured or dark streaks bleeding from a seam, a capped sill that flexes when pressed, sealant that has separated into a black line along the brick, or paint blistering on the interior side of the frame all point to water behind the aluminum. Cold-weather condensation on the inside of the metal is another culprit on north faces, where the cap never warms enough to dry.
Fastening mistakes matter too. Nails driven through the top of a sill cap or the horizontal leg of a head cap are direct water paths. Overdriven screws dimple the metal and crack the coating, and screws too close to the edge let the sheet lift in wind. A well-installed cap has fasteners only on vertical faces and undersides, spaced roughly 300 to 400 mm apart, with the heads sealed.
Sealing it right
Sealant is what turns bent metal into a finished, weather-tight assembly, and the wrong tube undoes good bending. For exterior aluminum in our climate the right choices are a polyurethane, a silyl-modified polymer (often sold as hybrid or MS polymer) or a high-quality neutral-cure silicone, all rated for movement of at least 25 percent and for application down to around -10 °C. Cheap acrylic latex caulking shrinks, cracks by the second winter and should never touch a capping job.
Every seam where two pieces of aluminum meet gets a bead, as does the joint between the cap and the window frame, and the joint between the cap and the masonry or siding. What should not be sealed is the bottom edge of a head cap or the underside of a sill: those need to stay open so any water that does get in can drain out. Fully caulking a window into a sealed box is the fastest way to guarantee trapped moisture.
Backer rod belongs in any joint wider than about 6 mm, so the sealant forms an hourglass bead that stretches instead of tearing. And the surfaces must be clean and dry; sealant on a dusty brick or a wet aluminum edge will peel within a season. The installer should tool each bead so it is concave and bonded on two sides only, which is why a neat capping job is often the sign of a crew that knows the rest of the trade.
Maintenance and inspection
Capping is close to maintenance-free, but not inspection-free. Once a year, ideally in May after the last frost and again in October before the first, walk the exterior and look at each window from a metre away. You are checking for seams that have opened, sealant that has cracked or pulled away, dents from ladders or snow blowers, and staining below the corners. A soft-bristle brush and mild detergent restore the finish; avoid pressure washers, which force water under the seams.
Sealant is the consumable. Even a good polyurethane bead will need renewing every 8 to 12 years in Quebec, sooner on south and west faces that take the most sun and rain. Cutting out old sealant and re-caulking a typical window takes an hour and a cartridge of material, and it is well within a homeowner's reach. Leave the metal work itself to a pro; re-bending or replacing a damaged cap without matching the original folds usually looks worse than the dent.
If you see a sill that gives under thumb pressure, do not seal over it. That is the moment to have the trim removed and the wood assessed, because a sill that has started to rot will not stop, and a replacement window installed on it will fail early.
- Twice a year: visual check of seams, sealant and staining
- Every 8 to 12 years: cut out and renew exterior sealant
- Immediately: any soft, flexing or stained sill gets opened up and inspected
What capping costs in Quebec
Capping is priced per window and per linear foot of trim. For a standard-sized window with brickmould on three sides and a sill, it is most economical when done as part of a window installation, since the crew and brake are already on site. As a stand-alone job, minimum call-out charges push up the price of a small project, and a full house of 12 to 15 windows is priced by trim width, storey height and colour. The exact figure depends on your openings and trim — request a free estimate.
The alternative, repainting exterior wood every four to six years, adds up in materials and labour each time and never fully stops the deterioration. Over a 20-year horizon capping is almost always cheaper, provided the wood under it is healthy on day one. That last condition is the whole story: pay for a proper inspection before the metal goes on, and the cap will do exactly what it promises.
Frequently Asked Questions
Does aluminum capping cause rot?
Not by itself. Rot happens when water gets behind the cap and cannot dry, usually through a failed seam, a flat sill or fasteners driven through horizontal surfaces. Well-bent, properly lapped capping with sound flashing above the window keeps wood drier than paint ever did.
Can I cap windows that already have rotten brickmould?
No. Capping over soft or checked wood traps moisture and accelerates the decay you cannot see. The wood should be replaced, or the window installed full-frame with new flashing, before any aluminum goes on.
Does capping match my PVC window colour?
Pre-painted coil comes in a wide palette, and most white, sandalwood, brown, charcoal and black frames have a close match. Ask to see a physical chip against the frame in daylight, since whites and greys look different on a screen than on the wall.
How long does capping last?
The aluminum and its baked finish typically last 25 to 40 years. The sealant at the joints is the weak link and needs renewal every 8 to 12 years in Quebec, sooner on the sunniest facades.
Is a drip cap really necessary above the window?
Yes. Without a head flashing or drip cap, water running down the wall tracks behind the trim and into the top of the frame. On brick it is normally a through-wall flashing with weep holes; on siding it is a bent metal cap under the course above the window.
Should the bottom of the capping be caulked?
No. The bottom edge of a head cap and the underside of a sill cap must stay open so any water that enters can drain out. Sealing a window into a closed box is one of the most common capping mistakes.